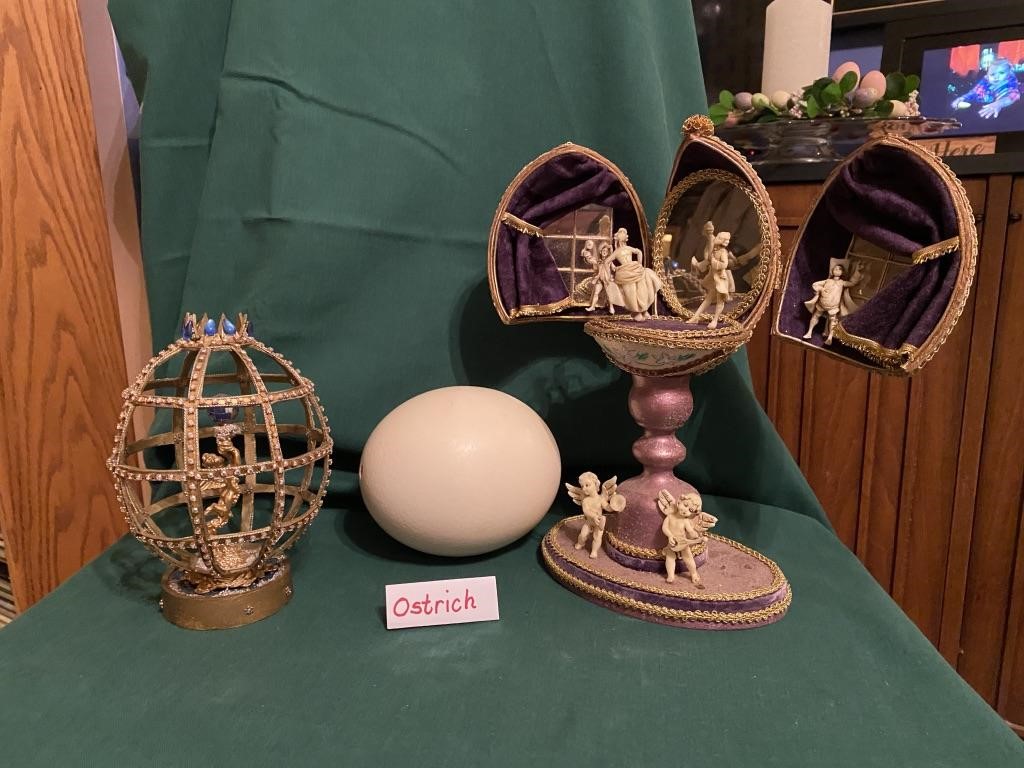
• Skip to primary navigation
  • Skip to main content
  • Skip to primary sidebar

Carnegie Museum of Natural History

One of the Four Carnegie Museums of Pittsburgh

  • Visit
    • Buy Tickets
    • Visitor Information
    • Exhibitions
    • Events
    • Dining at the Museum
    • Celebrate at the Museum
    • Powdermill Nature Reserve
    • Event Venue Rental
  • Learn
    • Field Trips
    • Educator Information
    • Programs at the Museum
    • Bring the Museum to You
    • Guided Programs FAQ
    • Programs Online
    • Climate and Rural Systems Partnership
  • Research
    • Scientific Sections
    • Science Stories
    • Science Videos
    • Senior Science & Research Staff
    • Museum Library
    • Science Seminars
    • Scientific Publications
    • Specimen and Artifact Identification
  • About
    • Mission & Commitments
    • Directors Team
    • Museum History
  • Tickets
  • Give
  • Shop

Super Science Days

October 22, 2021 by Kathleen

Spider Craft Activity

by Riley Riley

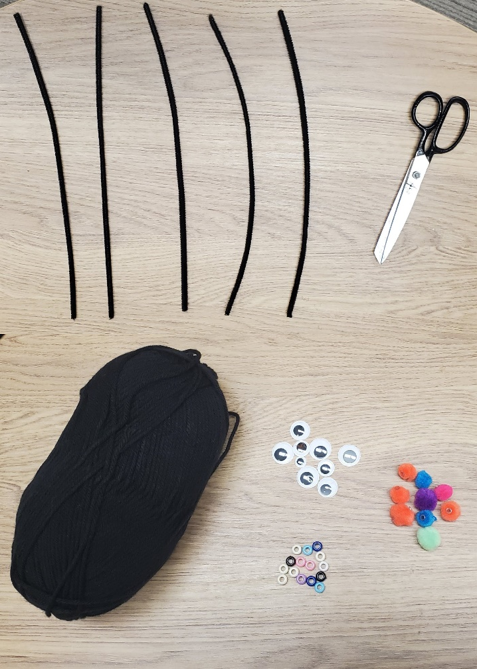
For this simple craft, you will need 5 pipe cleaners, scissors, and any (optional) decorative items to create a spider that you can place or hang around your space.  This activity requires a grown-up!

Spiders are an incredibly diverse group of arthropods that come in nearly every color, so don’t be afraid to get creative with the colors and decorations you use for your spider creation!

If you would like to know the names of some colorful and unique spiders, please check the list at the end of this guide to use in your future spider exploration!

Required materials for the craft activity and examples of optional decorative items like pom poms and googly eyes.

Instructions

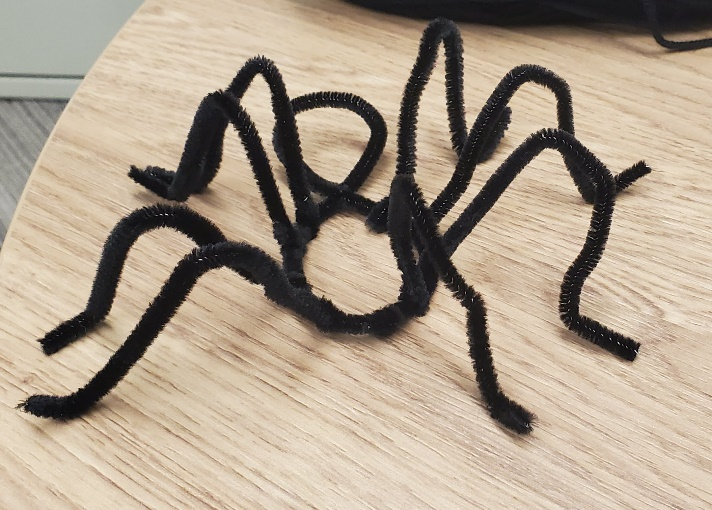
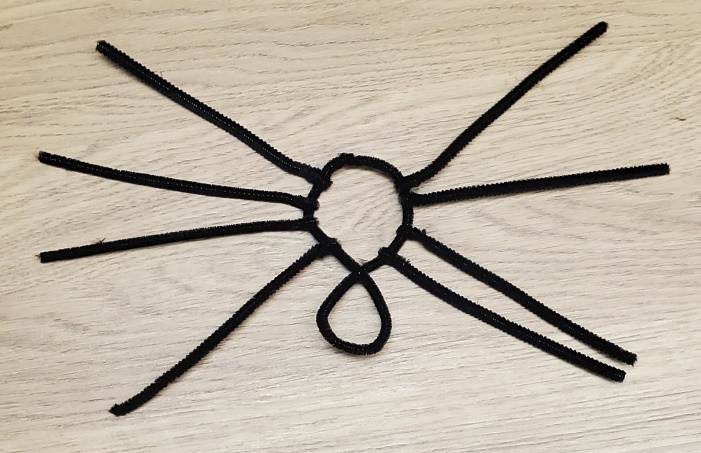
  1. Spiders, like all arachnids, have eight legs. So, the first step is to cut four pipe cleaners in half to make eight pieces that will be used as your spider’s legs.
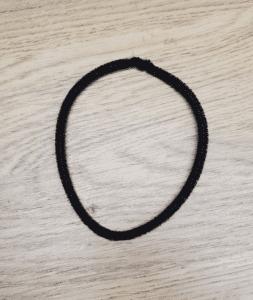
  2. We will use the remaining full pipe cleaner to create the spider’s body. First form a circle with the pipe cleaner and twist the ends together so that the circle remains closed.
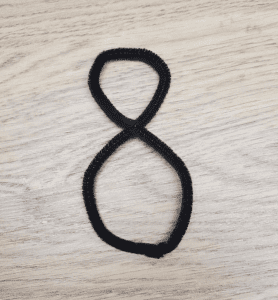
  3. Spiders have two body segments, the abdomen and the cephalothorax. To create these two segments, pinch and twist the circle so that it forms a figure eight.
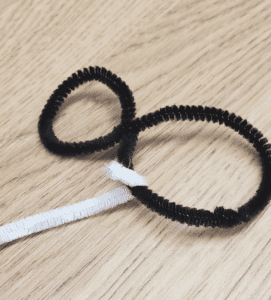
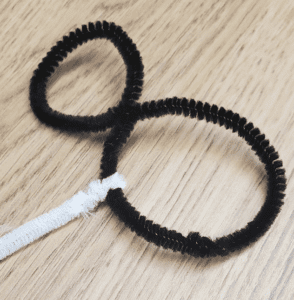
  4. Now it is time to attach the legs of your spider! All eight of a spider’s legs are attached to its cephalothorax, so choose one side of your figure eight to designate as the cephalothorax and begin attaching the legs. To do this, take one of the leg pieces and hook it around the side of the body. Twist the end of the leg piece to secure it to the body. Repeat this step seven more times until you have four legs on each side of the body.
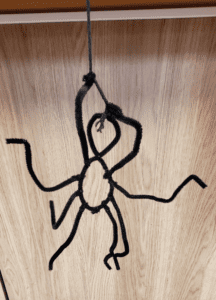
  5. At this stage, your spider is finished being constructed! You can leave your spider like this or you can bend the legs to create more of a 3-dimensional creature. This is when you can add any embellishments like pompoms, beads, or eyes to your spider as well.
Four pipe cleaners cut in half and one full length pipe cleaner
Full length pipe cleaner folded into a circle to make the body of the spider
Pipe cleaner twisted into a figure eight to form the body of the spider
Step one of attaching a leg to the body
Step two of attaching a leg to the body
Finished spider with its legs laid flat
spider made of pipe cleaners
Finished pipe cleaner spider with its legs bent
Finished pipe cleaner spider with yarn and decorative pompoms added at the end of each leg

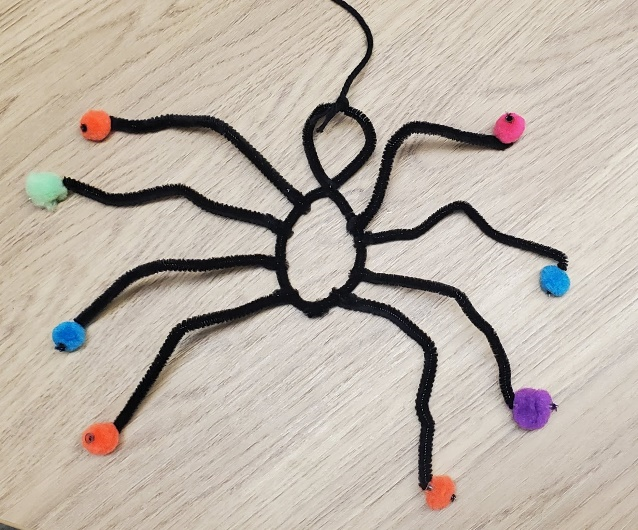
If you would like to hang up your spider, you can represent its spinnerets – the silk producing organs – by tying a piece of string or yarn to the end of the abdomen (the body segment without the legs).

Finished pipe cleaner spider hanging from a piece of yarn

The Spider Rainbow

Red – Dominican Spider (Alcimosphenus licinus)

Orange – Shamrock Orb-weaver (Araneus trifolium)

Yellow – White-banded Crab Spider (Misumenoides formosipes)

Green – Green Huntsman Spider (Micrommata virescens)

Blue – Singapore Blue Tarantula (Lampropelma violaceopes)

Purple – Ecuadorian Purple Tarantula (Avicularia purpurea)

Pink – Pink Crab Spider (Thomisus onustus)

Newton, B., & Bessin, R. (2009, November 19). Spider Anatomy. Kentucky Critter Files – University of Kentucky Department of Entomology. Retrieved September 30, 2021, from https://www.uky.edu/Ag/CritterFiles/casefile/spiders/anatomy/spideranatomy.htm.

World Spider Catalog (2021). World Spider Catalog. Version 22.5. Natural History Museum Bern, Retrieved September 30, 2021, from http://wsc.nmbe.ch  doi: 10.24436/2

Riley Riley is a Gallery Experience Presenter in CMNH’s Learning Department. Museum staff, volunteers, and interns are encouraged to blog about their unique experiences and knowledge gained from working at the museum.

Filed Under: Visitor Info Tagged With: Super Science, Super Science Days, Super Science Saturday

April 1, 2021 by wpengine

An Egg-cellent Hobby!

by Abbey Hines

When I first stumbled into writing this blog post, I had no idea what direction I wanted to take with this topic of eggs, but then I went to Carol’s house and heard her stories. It got me thinking of one of my least favorite topics as someone who studies zoology—humans. People have this unusual habit of talking. Language (particularly syntax) is one of the few characteristics that set humans apart from the rest of the animal kingdom. So please take a uniquely human journey with me as I tell you the story of Carol Megill’s eggs.

Carol and I are Gallery Experience Presenters here at the Natural History Museum; however, she’s been doing it a lot longer than I have—like 25 years longer. Before this job, Carol was a school teacher for mainly elementary grades. (She taught college for a while, too, but that’s not important to the story.) In the 1960s, a few years after she started teaching, Carol was tasked to teach a second-grade boy to read. He’d fallen behind and needed extra help that Carol was happy to give. She tutored him the whole school year and around Easter he was up to a proper reading level. As a thank you, the boy’s grandmother gifted her a blown decorated egg with a duckling inside. This was her first blown and decorated egg that would be the beginning of a collection and hobby that would change her life.

decorative gold egg with bird figurine

I’ve been trying to find an accurate definition of what Carol creates, but none seem fitting, so I will tell you how she makes them. She can only use certain regulation eggs due to the many proactive bird laws. Her eggs include a mix of chicken, goose, ostrich, rhea, emu, and peacock. First, she ‘blows out’ the egg by making a small hole in one end and blowing air into the cavity to empty out the albumen (whites) and the yolk. After it’s clean she can carefully cut into the shell without cracking it with a small Dremel drill. From there, it’s up to her imagination and artistic ability. They can take many forms, sometimes a scene erupts from within the eggs, a creature is formed from the egg, or it simply takes the shape of an amazing object to behold and interact with. She paints them with gold dust and glitter, adds hinges to make doors, and adds stands and scenery to transmute the egg into a stage for a story.

And the stories they tell! Each egg has its own history and Carol holds them carefully and is eager to share. Some are part of a set and belong with others, some she made to commemorate events or people, others she was trying a new technique that turned out amazing. Each is different and has a special place in the story of Carol’s eggs.

gold egg art
forest scene created from hollowed out eggs and paint
egg art of a couple looking at each other

Carol told me she used to travel with her eggs to display and sell them. Then her husband, who was nothing but supportive, asked her to stop selling her art so she did, keeping her creations in their large numbers to decorate her house.

shelves of decorative eggs

Carol says she doesn’t know how many eggs she has made over the years, but without a doubt, they are part of her amazing story as an educator, tennis player, mother and grandmother, Christian, art collector, and lovely woman.

woman holding a decorative egg
bowl of eggs decorated with stripes
farm scene made from chicken eggs
decorative emu eggs

decorative goose eggs

peacock eggs

decorative ostrich eggs

Abbey Hines and Carol Megill are Gallery Experience Presenters in CMNH’s Life Long Learning Department. Museum staff, volunteers, and interns are encouraged to blog about their unique experiences and knowledge gained from working at the museum.

Related Content

Super Science Activity: Paper Flowers

The Hunt is On! Eggs-traordinary Animals That Hide Their Eggs

Egg-cellent Egg Hunt Coloring Pages

Carnegie Museum of Natural History Blog Citation Information

Blog author: Hines, Abbey
Publication date: April 1, 2021

Share this post!

  • Share on Twitter Share on Twitter
  • Share on Facebook Share on Facebook
  • Share on Pinterest Share on Pinterest
  • Share on LinkedIn Share on LinkedIn
  • Share on Reddit Share on Reddit
  • Share via Email Share via Email

Share this post!

  • Share on Twitter Share on Twitter
  • Share on Facebook Share on Facebook
  • Share on Pinterest Share on Pinterest
  • Share on LinkedIn Share on LinkedIn
  • Share on Reddit Share on Reddit
  • Share via Email Share via Email

Filed Under: Blog Tagged With: Abbey Hines, Carol Megill, Educators, sssegghunt, Super Science Days

March 31, 2021 by Kathleen

Super Science Activity: Paper Flowers

Spring is here, and the flowers are blooming! Not all flowers bloom at the same time, but with these instructions and a few supplies, you can make your own beautiful paper bouquet of spring flowers that will last all year. Plus, learn a few facts about their living counterparts and why plants are more interesting than you might think with Mason Heberling, assistant curator and Sarah Williams, curatorial assistant in the Section of Botany at the museum! *This activity requires a grown-up!

Before we start, let’s talk about spring flowers!

Many plants that go dormant in the winter, or stop growth, like hibernation for plants respond to certain cues so that they emerge and bloom at the “right” time. These cues include spring temperatures, length of daylight, known as photoperiod, and a set length of cold period (known as vernalization or “winter chilling”). It’s complicated and we are still learning how different species respond differently to each of these cues.

Like many spring flowers, both in your gardens and in the woods, the plants we are making today have big belowground structures called bulbs.  Perennial plants with bulbs are known as geophytes (“geo” meaning earth and “phyte” meaning plant), these belowground bulbs come in many forms but serve as storage for energy (sugars) and water. Many geophytes can live many years and because their bulbs are protected belowground, have evolved to withstand many stresses, including fire, extreme temperatures, lack of water, and more. When the soil warms, sometimes even the slightest amount, in the spring, these belowground bulbs fill with water, cells expand, and out of the ground comes the beautiful flower!  These flowers are not only beautiful to us—they signal to attract insects and wake up the web of life in our region.

supplies to make paper flowers

What You’ll Need

  • Colored construction paper or card stock (make sure to have green paper for the stems!)
  • Scissors
  • Pencil
  • A small surface to roll paper (this project used the end of a paintbrush)
  • A ruler
  • Glue
  • *OPTIONAL* Green Pipe Cleaners for stems instead of green paper

How to Make a Paper Hyacinth

  1. Measure and cut a 9×2 (or, if you are using cardstock, 8/8.5×2) rectangle from your colored paper (this is for the flower portion, please see the directions below on how to make stems and leaves. Measure out 3/8’’ from the bottom of your 9×2 rectangle and draw a line across the entire length of one side. Cut out small rectangles roughly 1/4’’ in size (these don’t need to be accurately measured and look more natural when a little different in sizes!), stopping before the pencil line at the top of the rectangle.
  2. Repeat your cuts across the length of the entire rectangle. Flip your rectangle over to hide the pencil marks.
  3. Using a small surface to roll your paper (like a pencil), roll each strip tightly (it’s ok if they loosen at any point during construction, just make sure they’re still rolled a little).
  4. Flip your rolled-up strips so that your pencil marks from earlier are facing up
  5. Glue along the bottom of the rectangle
  6. Make a paper stem and some leaves, or use green pipe cleaners. Holding your stem and your rolled-up strips, begin by placing the end of the roll to the top of the stem and slowly work your way down by spinning the stem (this may take several minutes—just go slowly and hold your roll to the stem for a few seconds until it has a chance to stick!). Continue down until the end of the roll
  7. Wait for the glue to fully dry before adding leaves
making a paper hyacinth by cutting paper into strips, rolling and gluing it

How to Make a Paper Daffodil

  1. Cut out a 4×4 square from your paper
  2. Fold your paper diagonally to make a triangle.
  3. Fold your paper in half two more times to make a smaller triangle.
  4. Cut a petal shape from the end of the outer corner of you triangle to the inner corner where all of the folds meet. Cut off the tip of the inner corner of your triangle.
  5. Cut a circle out of your paper (size doesn’t matter, but don’t make it too small!).
  6. Cut your circle in half.
  7. Using one half of your circle, fold it into a cone.
  8. Unfold your petal shape from step 4—it should look like a flower with a hold in the center (if it doesn’t, repeat the first steps and cut the petal shape from the opposite direction). Glue your cone from step 7 into the middle of the flower and hold it in place until the glue dries.
  9. Gently push your cone through the center of the daffodil and glue where the sides of the cone meet the petals.
  10. Create a stem (or use pipe cleaners), and glue the end of the stem to your daffodil.
  11. Hold the daffodil in place for a few moments while the glue dries.
  12. Create a leaf or two and glue to your stem.
steps to make a paper daffodil including folding and cutting paper shapes

How to Make a Tulip

  1. Cut out three 3×3 sheets of paper. Stack the papers on top of each other and fold them in half.
  2. Draw a petal shape on the side of the fold.
  3. Cut out the petal shape using the pencil lines as a guide.
  4. Take one petal and glue both sides. Place the other two petals on either side of the glue. Hold down the petals gently until the glue dries.
  5. Create a stem (or use pipe cleaners), and glue the end of the stem to your tulip.
  6. Create a leaf or two and glue to your stem.
steps to make a paper tulip by cutting shapes

About Hyacinths

hyacinth herbarium sheet
  • Hyacinth has a single dense spike of fragrant flowers in shades of red, blue, white, orange, pink, violet or yellow
  • Hyacinth bulbs are poisonous; they contain oxalic acid. Handling hyacinth bulbs can cause mild skin irritation. Protective gloves are recommended.
  • Very fragrant, commonly used in perfume
  • Though only including three species, Hyacinths have been grown in gardens and bred over the past centuries, with thousands of named varieties (known as “cultivars”)
  • Wild hyacinths are native to Mediterranean and western Asia (including Israel, Lebanon, Syria, Turkey) but are widely grown around the world.

About Daffodils

daffodil herbarium sheet
  • Though known by human cultures long before and grown for many centuries, Carl Linnaeus formally described and named Narcissus in his famous book Species Plantarum in 1753. The genus was also described in the Flora of North America in part by former Carnegie Museum of Natural History Curator of Botany, Frederick H. Utech, who studied many species in the Lily family, including daffodils.
  • Daffodils include many species and varieties, native to the Eastern Mediterranean, but very hardy, growing very well across North America.  It is not uncommon for daffodils to get snowed on and still bounce back!  It has even naturalized in many areas, meaning it can survive without a gardener’s help outside of gardens.
  • In Germany the wild narcissus, N. pseudonarcissus, is known as the Osterglocke or “Easter bell.” In the United Kingdom the daffodil is sometimes referred to as the Lenten lily.

About Tulips

tulip herbarium sheet
  • Tulips have a very long human history of cultivation, dating back more than a thousand years.
  • Tulips were once so popular in the Netherlands that they were used as money in the 1600s!
  • Seeds take 7-12 years before they’ll form a flowering bulb
  • In Amsterdam, you can go on tours of whole fields and greenhouses of Tulips.
  • Tulips are native to N. China / S. Europe, cultivated in Turkey by the Ottoman Empire, imported to Holland in the 1500s.

More from our Botanists

What exactly is a botanist? What types of plants do you study?

A botanist is someone who is curious about plants. That’s it! No degree required, you don’t need to be a professional botanist, but you certainly can be!  Like many botanists, I am interested in many different types of plants, but in particular, study plants in our forests, especially our native spring wildflowers. 

Why is this information important? Does it connect to other sciences?

The understory layer in our forests comprise many different types of species. In fact, there are far more species in the understory than the overstory!  Beyond their beauty, they serve important roles in the how our ecosystem functions – from the flow of nutrients and regulating our climate to feeding bugs, birds, and animals that depend upon them.  In particular, I study the impacts of climate change and introduced species in our forests. I use field experiments, observations, and our museum collections to understand the past, present, and future of the plant which we all depend.  Botany connects to many areas of science, including agriculture (the food we eat!), medicine, environmental chemistry, and many more. The Section of Botany has even been consulted in legal cases and crime scene investigations.

How long have you been a botanist?

Dr. Heberling: I’ve been fascinated by plants since college, but I actually didn’t refer to myself as a “botanist” until later.  Even earlier, I loved nature as a kid and grew up with a garden.  Yet, I did not really discover plants as a career or calling until college. I thought I had to be a doctor to go into biology, or at least had to study animals. But at some unknown point, it clicked – plants are incredible and incredibly important! My path to becoming a museum curator was driven by my interests and only partially planned. There are many avenues to explore, many equally as fulfilling and important.  And I’m fortunate to have landed where I have, in a collection of more than half a million specimens, studying the power of plants.

What is your favorite flowering plant?

Dr. Heberling: My favorite spring flowering plant: There are many!  But I have a special liking to our native Trillium species. Seeing a forest full of Trillium is an experience like no other. 

Sarah Williams: Hyacinth because the smell is wonderful. Forsythia because it’s the first sign for me that it’s really real Spring is here. Dutchman’s breeches because they’re pretty and look like tiny teeth.

If a child is interested in plants, what career paths could they follow and where is a good place for children to start that path?

Dr. Heberling: Get outside!  That’s the best place to start. It need not be somewhere exotic. Observe. Notice what you notice.  Then, start trying to identify what’s around you.  Join scouting if you can, or similar groups. The best thing is to discover your passion. There are many careers that involve plants – they not only are part of the landscape, but they ARE the landscape.  From agriculture to parks/recreation to many areas of conservation and scientific study – many careers directly involve plants.

Filed Under: Blog, Super Science Saturday Tagged With: sssegghunt, Super Science Days

March 8, 2021 by Kathleen

Super Science Activity: DIY Sundial

Today we use clocks to help us keep track of time, but in the past, humans relied on the planets, stars, and even our sun to mark significant yearly events. A useful tool different cultures independently invented was the sundial—a flat instrument that uses the position of the sun to accurately track the passage of time. You can use some simple supplies to make your own sundial and learn the science behind it! *This activity requires a grown-up!

Antique Sundial

What You’ll Need

  • Paper plate
  • Pencil, straw, or a long thin object
  • Tape measure or yardstick
  • Tape
  • Watch or clock
  • Ruler
  • An outdoor space in natural daylight
  • *OPTIONAL* Markers or crayons to decorate

Directions

*For best results, either start earlier in the day or work on this project for multiple days.

  1. Find your test area—this should be an open space with good natural daylight and away from any shadows. Use chalk or a visual marker to mark this area.
  2. Stand in your area and have a grownup trace the outline of your shadow on the ground with chalk. Write the current time at the top of your shadow.
  3. Use a pencil or pen to poke a hole through the center of the paper plate
  4. Write down the time on the edge of your plate. Use a ruler to draw a straight line from the number you wrote to the hole in the center of the plate.
  5. Take your plate and plastic straw outside and place on the ground in your marked area. Slant the straw so that it points to the line you drew on the ground
  6. Rotate the plate so that the shadow of the straw lines up with the line you drew
  7. Place some stones on the plate to keep in place, but be careful not to tip over the straw
  8. Check on your plate every hour. What happened to the shadow of the straw?
  9. Record the position of the shadow of the straw by writing the current time on the edge of the plate where the shadow falls. What shape is your shadow moving in? What does this remind you of?

So, what’s the science behind the dial? Sundials come in many different forms depending on which cultures used them, but they have two key common features—they’re typically made on flat platforms or surfaces and have a thin, upright rod that casts a shadow on the dial called a gnomon. The reason the shadow moves so precisely on the flat platform is due to the Earth’s rotating axis; as the earth rotates around the sun, the shadows on earth change position as well.

Sundials aren’t just a part of ancient history, either; sundials were commonly used as late as the 16th century!

The next time you see a clock, whether a digital or an analog clock on the wall, remember that these inventions and so many others we use day-to-day have very ancient beginnings!

Filed Under: Blog Tagged With: Archaeology Extravaganza, Super Science Days

March 5, 2021 by wpengine

Follow Your Dreams, My 70 Years as an Archaeologist

Archaeology usually conjures up Indiana Jones as an example of the thrills and dangers of archaeological research. Archaeology is a relatively safe occupation, although there are exceptions, such as the archaeologist who stood on top of a Mayan pyramid who was struck by lightning. There are many fields of archaeology that focus on geographic areas and time periods, from hunters and gatherers over hundreds of thousands of years to the last 10,000 years of the rise of civilizations around the world. There are many cultural specialties in archaeology such as Egyptology, Classical archaeology, focusing on the Mediterranean Greek and Roman, Mayan, Inca, U.S. Southwest and so forth. A field represented in Pittsburgh is Biblical archaeology at the Pittsburgh Theological Seminary with its Kelso Museum of Near Eastern Archaeology. At the University of Pittsburgh in the Department of Anthropology there is a focus on Mexico, Central and South America, Eastern Europe, China, and Central Asia with currently over 30 graduate students and faculty conducting research in these regions.

The Section of Anthropology of the Carnegie Museum of Natural History, for over 100 years, has conducted archaeological research in Egypt, Israel, Central Asia, Caribbean, Costa Rica, Peru, the Upper Ohio Valley and holds collections from other areas of the Americas and the world though donations or purchase. The richness of the Section’s collections can be seen in Walton Hall of Ancient Egypt, Polar World: Wyckoff Hall of Arctic Life, and Alcoa Foundation Hall of American Indians.

From an early age I wanted to be an archaeologist. My father was worried that archaeology wouldn’t provide much of a livelihood, so he arranged a visit with the director of the Peabody Museum at Harvard when I was a teenager. My father asked the director J. O Brew if one could make a living as an archaeologist and he answered, “it’s better if you’re independently wealthy.” This didn’t deter me from following my dream of becoming an archaeologist. My archaeological career is filled with luck and serendipity where seizing an offered archaeological opportunity or discovery of a significant artifact, not only guided my research, but where I worked. I have a parallel career in historic colonial sites and in prehistoric maritime adaptations. I became intrigued with archaeology at an early age visiting the Springfield Science Museum and joining a chapter of the Massachusetts Archaeological Society based at the museum. I went out on their excavations at sites in the Connecticut River Valley, one which was in 1957 in South Hadley where I learned how to uncover burials. From summering in the Lake George area of New York State I became interested in historic archaeology due to all the French and Indian War (1754-1763) forts in the region. In 1952 at age 16, I was a crew member for two summers at the excavations of Fort William Henry, made famous by James Fenimore Cooper’s novel The Last of the Mohicans.

Excavation of Fort William Henry at the Head of Lake George, New York 1952. (Photo Credit Dr. Richardson)

black and white photo of an archaeologist at work in a red frame

Fort William Henry was destroyed by French and Indian forces in 1757. In 1952, excavations and reconstruction of the fort began on what became a major tourist attraction. Photos show Dr. Richardson pointing to a photo of his 16-year-old self-excavating the site. (Photo Credit: Dr. David Watters)

I also summered on Martha’s Vineyard where in 1954 I dug at a coastal site with an associate of the Martha’s Vineyard Museum which stimulated my desire to become a maritime archaeologist. At St. Lawrence University I majored in Sociology and Anthropology and in 1957 I wrote a letter to the Smithsonian Institution asking to go on one of their expeditions and was accepted on a crew that set up a tent camp on the Big Bend of the Missouri River in South Dakota excavating at the Black Partisan village site. While at SLU I also was a crew member in 1959 at the excavations of Johnson Hall in Johnstown, NY, the home of Sir William Johnson, the British Superintendent of Indian Affairs during the French and Indian War.

Smithsonian Institution camp on the Lower Brule Sioux (Lakota) Indian Reservation in South Dakota, 1957. (Photo Credit: Dr. Richardson)
Dr. Richardson in the Smithsonian Camp 1957. (Photo Credit: Warren Caldwell)
Dr. Richardson lounging at the Black Partisan Site, an excavation of an earth lodge at Lower Brule Reservation. (Photo Credit: Warren Caldwell)
Dr. Richardson excavating a food storage pit at the Black Partisan Site. (Photo Credit: Warren Caldwell)

At Syracuse University for my master’s, I crewed in 1962-63 on 3 sites in up-state New York directed by William A. Ritchie, the State Archaeologist from the New York State Museum. I mentioned to him my interest in maritime archaeology and urged him to develop a research project on Martha’s Vineyard, which he did, excavating 6 sites from 1962-1966 on which I of course I participated. After Syracuse in 1963, I with my wife Judy went to the University of Illinois for my Ph.D. in northeastern U.S. archaeology, focusing on the maritime Vineyard. Here one of my advisors came out of his office and shouted down the hall to me “Jim, do you want to go to Peru?” To which I replied, “of course if you’re paying.” An excellent case of seizing the moment that fit well with my career goal of becoming a maritime specialist. In 1965 my wife Judy and I went to Talara, the second oldest operating oil field in the world after Drake well in western PA. Talara is 100 miles south of the Ecuadorian border and here I located an 8,000-year-old shell midden called Siches, which held evidence from warm and cold ocean fish and shellfish species. Based on the evidence at this coastal fishing and shellfish gathering society and other sites on the coast of Peru I and my colleague Dan Sandweiss, a Research Associate of the Section, developed the theory that this was evidence of a major shift in the change from a warm water to a cold water current washing the Peruvian north coast and the origins of El Niño around 5,800 years ago, the worldwide drought and flood disasters. My doctorate in 1969 was on the changing climate and coastal sites in the Talara region. I also dug in southern Peru at the Ring Site, an 10,500-year-old massive shell midden with cold water fish and shellfish. In addition, my students and I surveyed pyramid centers in the Talara area as well.

Dr. Richardson excavating Jackie Onassis’s property on Martha’s Vineyard in 1982. This site is called the Hornblower II Site. (Photo Credit: Jim Peterson)
Dr. Richardson in the cellar hole of the John and Experience Mayhew House Site c.1672-1658 on Martha’s Vineyard in 1985. (Phot Credit: Jim Peterson)
The Ring Site Ilo, Peru 1983 a 10,500-year-old Shell Midden. (Photo Credit: Dr. Richardson)
Dr. Richardson in the shell midden profile of the Ring Site, Peru. (Photo Credit: Daniel Sandweiss)
Aerial view of the Siches Site in the lower half of the photo, Talara, Peru (Photo Credit: Dr. Richardson)
Excavation at the Siches Site, which provided evidence for the origins of the El Niño weather catastrophe in 5800bp (Photo Credit: Dr. Richardson)

I did return to Martha’s Vineyard in the early 80’s excavating 2 shell middens and a Colonial house site of missionaries to the Wampanoag. In western Pennsylvania in 1970 I directed a field school for the University of Pittsburgh at the Revolutionary War site of Hanna’s Town in Westmoreland County, the first County Seat west of the Alleghenies. This town of 30 log cabins and a fort was destroyed by an Iroquois and British attack in 1782. Here we excavated Charles Foreman’s tavern.

Reconstructed Fort of the Hanna’s Town Site. (Photo Credit: Dr. Richardson)
1970 university of Pittsburgh Field School Excavation of Forman’s Tavern, Hanna’s Town, PA. (Photo Credit: Dr. Richardson)

I came to the University of Pittsburgh in 1967, retiring in 2009. While at Pitt serving as chairman, I was approached by then director Dr. Craig Black to take over the chair of the Section of Anthropology in 1978 and accepted a half-time position as chief curator until my retirement in 2006. The only thing that has changed in my retirements was receiving a salary! I am currently writing up some sites from my Peruvian and Martha’s Vineyard research and have a book in press on a colonial site on Martha’s Vineyard where I am a board member of the museum. I am also still involved with Pitt graduate students and in programs at the Carnegie Museum of Natural History, so little has changed in my archaeological career since I first put a shovel in the ground in 1952.

Dr. Richardson holding a gold spider from the Royal Moche Tombs of Sipan in Lambayeque, Peru 1990. (Photo Credit: Daniel Sandweiss)

Dr. James B. Richardson III is Curator Emeritus in the Section of Anthropology at Carnegie Museum of Natural History and University of Pittsburgh Anthropology Professor Emeritus. Museum employees are encouraged to blog about their unique experiences and knowledge gained from working at the museum.

Related Content

How I Became an Archaeologist

Pennsylvania Archaeology and You

Super Science Activity: Natural Paints

Carnegie Museum of Natural History Blog Citation Information

Blog author: Richardson, James
Publication date: March 5, 2021

Share this post!

  • Share on Twitter Share on Twitter
  • Share on Facebook Share on Facebook
  • Share on Pinterest Share on Pinterest
  • Share on LinkedIn Share on LinkedIn
  • Share on Reddit Share on Reddit
  • Share via Email Share via Email

Filed Under: Blog Tagged With: archaeology, Archaeology Extravaganza, James Richardson, Science News, Super Science Days

March 4, 2021 by Kathleen

Super Science Activity: Natural Paints

In the modern world, it’s very easy for us to buy or make clothing, jewelry, makeup, or other decorations in almost any color we want, but we often don’t think about how those colors are made. Typically, items are painted or dyed with artificial or natural colorants—especially clothing or other textiles. But how did our ancestors create beautiful works of art or colorful garments and accessories? Believe it or not, applying color to objects with natural ingredients has been in practice for thousands of years, and is something archaeologists are still learning more about from different cultures at different points in human history.

There are two different types of methods to applying color on an object—either using a pigment, a natural material that is insoluble, orimpossible to dissolve completely, or a dye, a natural material that is soluble and easily dissolves when added to a mixture

Make-Your-Own Watercolor Paints

Natural dyes can also be used to make paint, specifically watercolor paints. The intensity of the color can be affected by adding more of the natural dye than water; adding more water will diminish the color. With the help of a grownup, you can make your own paints from natural ingredients you may have at home! *This activity requires a grown-up! (Although these paints are using natural ingredients, they are not intended for consumption)

*TIP: frozen fruits and veggies give off a lot of color when they’re thawed and mashed!

What You’ll Need

  • 4 Tbsp. white vinegar
  • 5 Tbsp. Corn starch
  • 5 Tbsp. Baking soda
  • Watercolor paper
  • Paintbrushes
  • Water
  • Natural ingredients to make paints (examples down below)
  • Small mesh strainer
  • Mixing bowel
  • Whisk
  • Container(s) to hold watercolor paints (old ice cube trays work great!)
  • Towels/cleaning supplies
  • *OPTIONAL* blender or juicer
  • *OPTIONAL* cheese grater for root vegetables
  • *OPTIONAL* Markers or crayons to decorate
  • *OPTIONAL* Table salt to make unique designs

Directions

*Ingredients can vary depending on what you have or what colors you’d like to use

  1. Combine the vinegar, baking soda, corn starch, and corn syrup in your mixing bowel
  2. Stir or whisk until completely dissolved
  3. Pour mixture into your container(s) to hold watercolor paints until about half-full
  4. Find natural ingredients around your house that are different colors. These can include fruit like raspberries to make red; blueberries to make blue paint, paprika or other spices to make dusty reds and browns; carrots or beets; or even coffee grounds and tea bags! *Make sure to ask a grownup for help*
  5. Place your mesh strainer over your mixing container. Begin placing ingredients into your mesh strainer and either using a whisk or potato masher to smash down your ingredients one at a time
    • OPTIONAL: if you have a juicer or blender, use this to condense your ingredients instead
  6. Once the liquid has been extracted and is in your mixing bowl, pour the liquid into one of the containers that has the vinegar, baking soda, etc. mixture. Use as little or as much to vary the color
  7. Mix colors into the corn starch mixture well
  8. Clean out mixing bowl to ensure no color contamination
  9. Repeat steps 1-8 for other colors
    • If you’re using leaves or root vegetables like beets or carrots, you can grate the roots down and use a muslin cloth to squeeze out juice
  10. Once you have your colors, you’re ready to paint on your watercolor paper
    • OPTIONAL: use markers or colored pencils to enhance your art
    • OPTIONAL: if you have table salt, try putting down some paint on your paper and adding a sprinkle of salt. What happens to the painted area?
  11. Because our combined mixture has corn starch, these paints will dry out quickly, but can be reused by adding a little water, just like artificial watercolors. Keep refrigerated when not in use. Paints will last (refrigerated) for 5-7 days

Filed Under: Blog Tagged With: Archaeology Extravaganza, Super Science Days

  • Page 1
  • Page 2
  • Page 3
  • Interim pages omitted …
  • Page 9
  • Go to Next Page »

sidebar

About

  • Mission & Commitments
  • Directors Team
  • Museum History

Get Involved

  • Volunteer
  • Membership
  • Carnegie Discoverers
  • Donate
  • Employment
  • Events

Bring a Group

  • Groups of 10 or More
  • Birthday Parties at the Museum
  • Field Trips

Powdermill

  • Powdermill Nature Reserve
  • Powdermill Field Trips
  • Powdermill Staff
  • Research at Powdermill

More Information

  • Image Permission Requests
  • Science Stories
  • Accessibility
  • Shopping Cart
  • Contact
  • Visitor Policies
One of the Four Carnegie Museums | © Carnegie Institute | Privacy Policy | Terms of Use | Accessibility
Rad works here logo