What triggers an extinction event, and how do scientists use evidence of mass extinctions to prepare for the future? Explore the causes of extinction throughout geologic time and learn how humans are having an impact today. Meet scientists who use their discoveries to understand our changing climate and explore conservation success stories of local species brought back from the edge of extinction.
[swaddtocarttimed site=”6″ group=”279″ sw_msg_add_to_cart=”Items have been added. Proceed to Cart.“]
Sponsors
Super Science Saturdays are sponsored by PA Cyber, Tender Care Learning Centers, a proud partner of Carnegie Museums of Pittsburgh, and Discover Westmoreland.
Free with admission! Join us for chats with dinosaur experts, crafts, tours, and Dippy-themed fun.
Join us for a Jurassic celebration as we celebrate the 125th anniversary of the discovery of Dippy, Pittsburgh’s oldest icon! Try your hand at excavation in Bone Hunters’ Quarry and learn how scientists safely bring specimens back from the field. Hear about the most recent dino discoveries and ask museum staff your most pressing questions about the flora and fauna that inhabited one of the most fascinating—and popular—geological periods in our Earth’s history.
[swaddtocarttimed site=”6″ group=”279″ sw_msg_add_to_cart=”Items have been added. Proceed to Cart.“]
Sponsors
Super Science Saturdays are sponsored by PA Cyber, Tender Care Learning Centers, a proud partner of Carnegie Museums of Pittsburgh, and Discover Westmoreland.
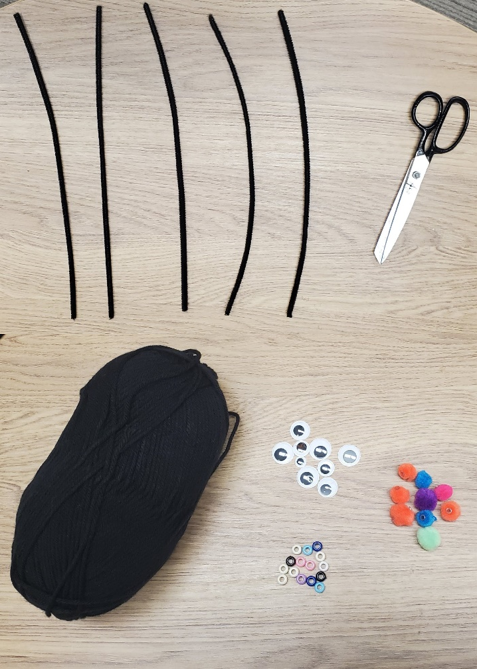
For this simple craft, you will need 5 pipe cleaners, scissors, and any (optional) decorative items to create a spider that you can place or hang around your space. This activity requires a grown-up!
Spiders are an incredibly diverse group of arthropods that come in nearly every color, so don’t be afraid to get creative with the colors and decorations you use for your spider creation!
If you would like to know the names of some colorful and unique spiders, please check the list at the end of this guide to use in your future spider exploration!
Required materials for the craft activity and examples of optional decorative items like pom poms and googly eyes.
Instructions
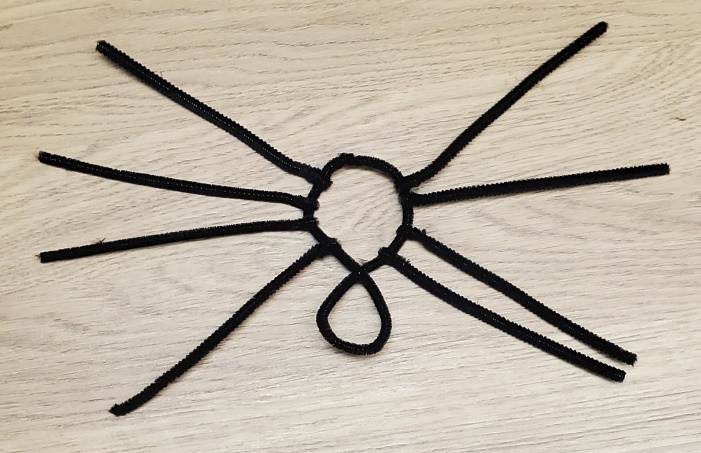
Spiders, like all arachnids, have eight legs. So, the first step is to cut four pipe cleaners in half to make eight pieces that will be used as your spider’s legs.
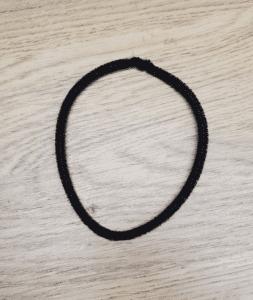
We will use the remaining full pipe cleaner to create the spider’s body. First form a circle with the pipe cleaner and twist the ends together so that the circle remains closed.
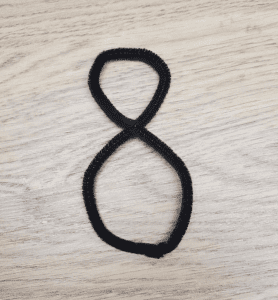
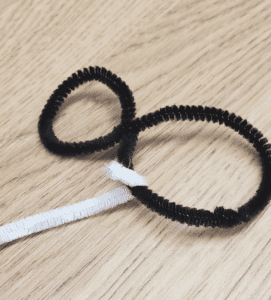
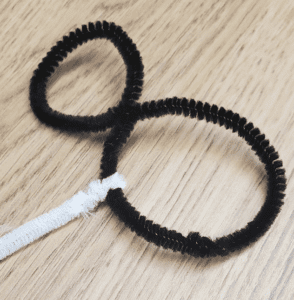
Spiders have two body segments, the abdomen and the cephalothorax. To create these two segments, pinch and twist the circle so that it forms a figure eight.
Now it is time to attach the legs of your spider! All eight of a spider’s legs are attached to its cephalothorax, so choose one side of your figure eight to designate as the cephalothorax and begin attaching the legs. To do this, take one of the leg pieces and hook it around the side of the body. Twist the end of the leg piece to secure it to the body. Repeat this step seven more times until you have four legs on each side of the body.
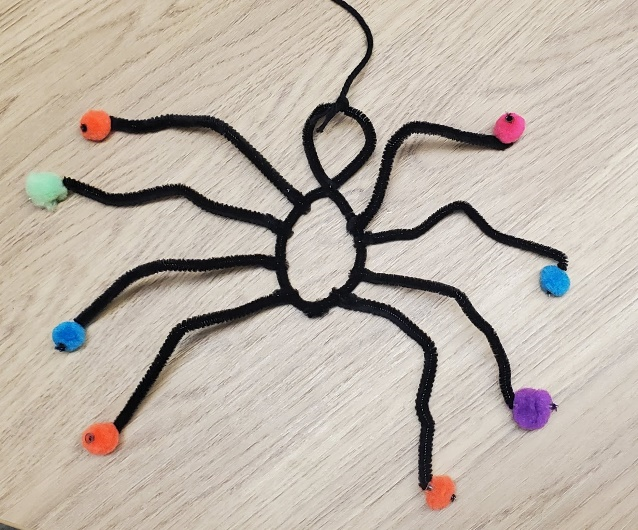
At this stage, your spider is finished being constructed! You can leave your spider like this or you can bend the legs to create more of a 3-dimensional creature. This is when you can add any embellishments like pompoms, beads, or eyes to your spider as well.
Four pipe cleaners cut in half and one full length pipe cleaner
Full length pipe cleaner folded into a circle to make the body of the spider
Pipe cleaner twisted into a figure eight to form the body of the spider
Step one of attaching a leg to the body
Step two of attaching a leg to the body
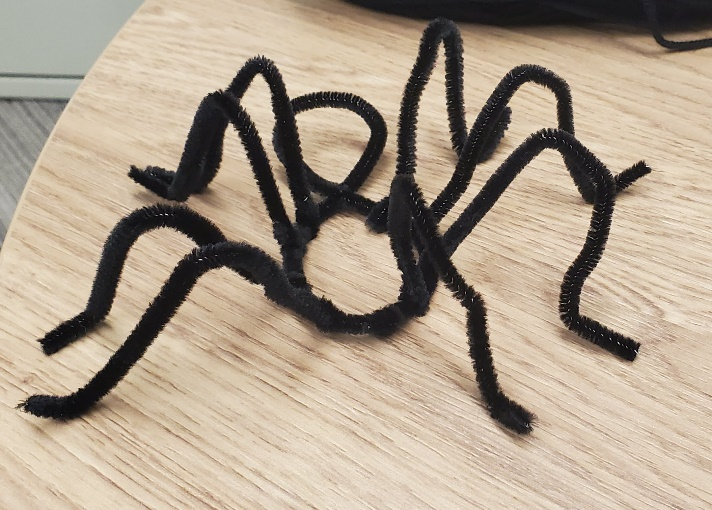
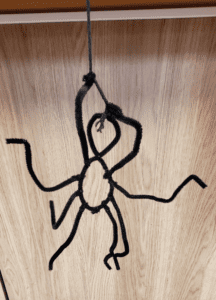
Finished spider with its legs laid flat
Finished pipe cleaner spider with its legs bent
Finished pipe cleaner spider with yarn and decorative pompoms added at the end of each leg
If you would like to hang up your spider, you can represent its spinnerets – the silk producing organs – by tying a piece of string or yarn to the end of the abdomen (the body segment without the legs).
Finished pipe cleaner spider hanging from a piece of yarn
World Spider Catalog (2021). World Spider Catalog. Version 22.5. Natural History Museum Bern, Retrieved September 30, 2021, from http://wsc.nmbe.ch doi: 10.24436/2
Riley Riley is a Gallery Experience Presenter in CMNH’s Learning Department. Museum staff, volunteers, and interns are encouraged to blog about their unique experiences and knowledge gained from working at the museum.
Pittsburgh, PA – Carnegie Museum of Natural History invites young nature lovers and their families to participate in a free week of Super Science Days, featuring spring activities to do with kids from home. Super Science Days kick off April 6 on the museum’s website and Facebook, Instagram, and Twitter channels @CarnegieMNH.
Hosted by the museum’s Lifelong Learning department, Super Science Days include Spring-o Bingo, DIY Whipped Cream Eggs, DIY String Eggs, bird’s nest crafts, and other scientific celebrations of spring.
“The Super Science Egg-cellent Egg Hunt is a beloved tradition for our museum team and visitors alike. While we are going to miss the joy of welcoming families to the museum this year, we look forward to sharing our favorite spring-themed activities for you to try at home,” says Director of Education Laurie Giarratani, “We’ve really enjoyed working on creative content for virtual engagement and are excited to connect with our community in a new way this year.”
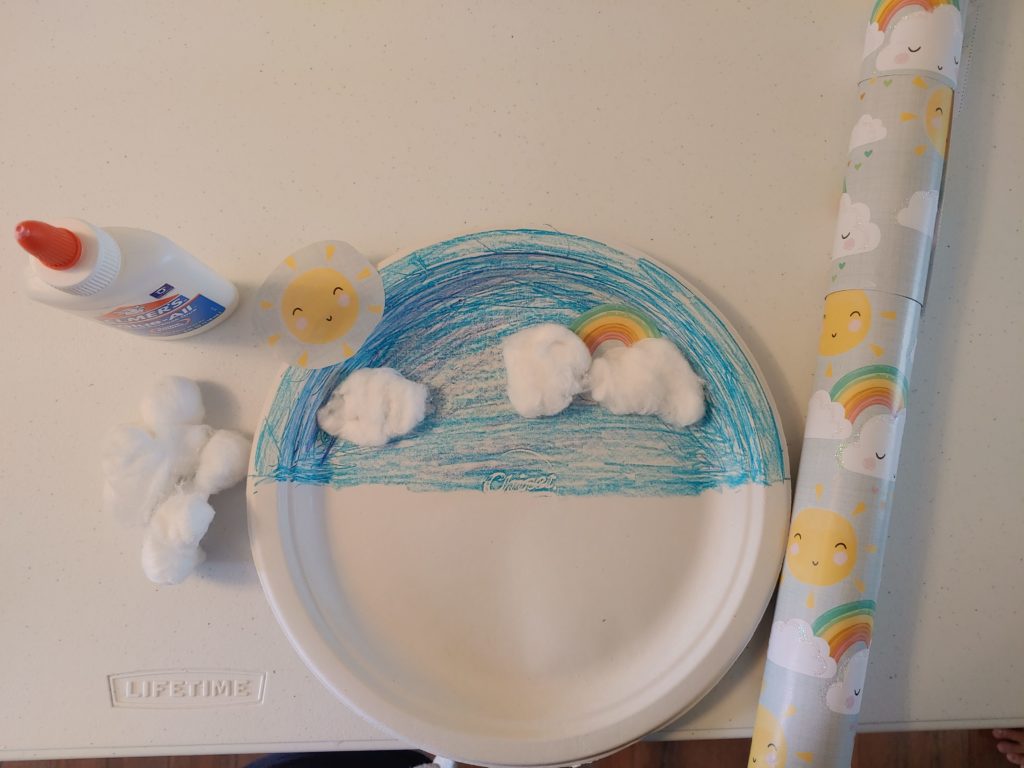
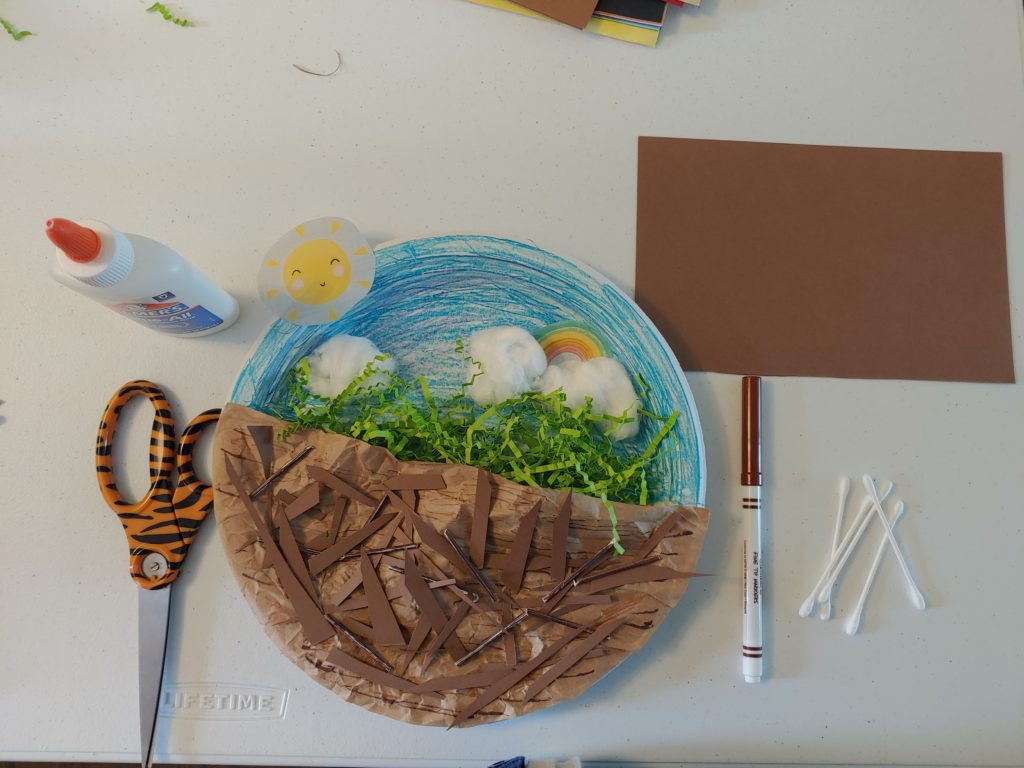
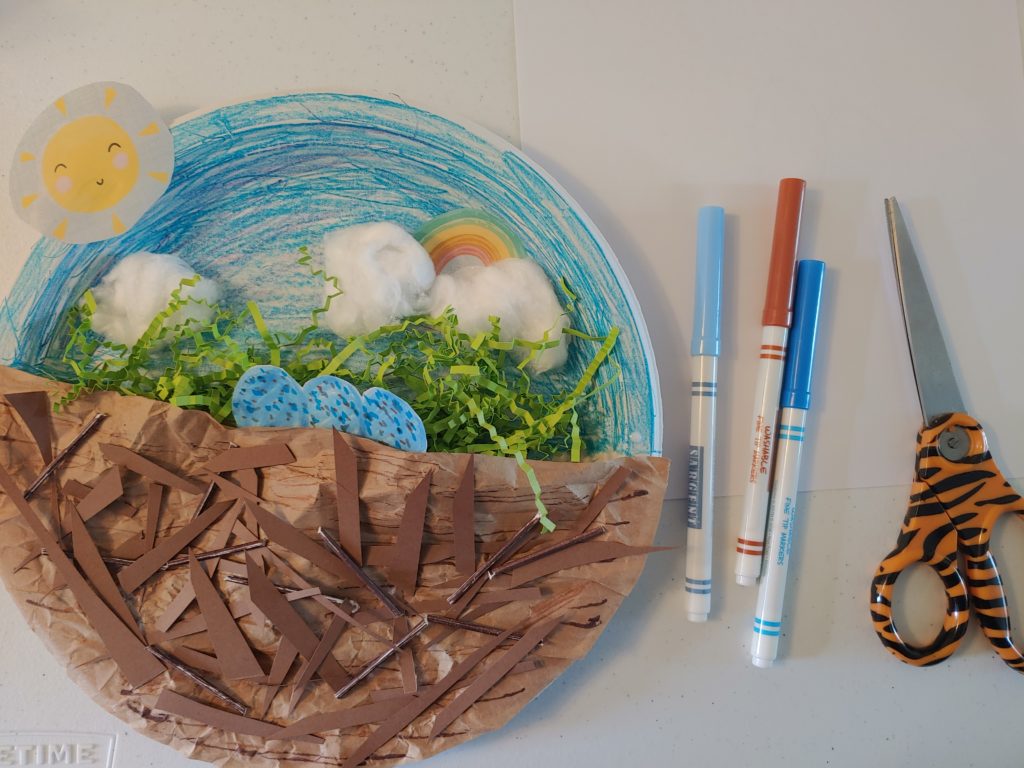
Use crayons or markers to color the sky on your paper plate (or whatever you’ve chosen as the base of your nest).
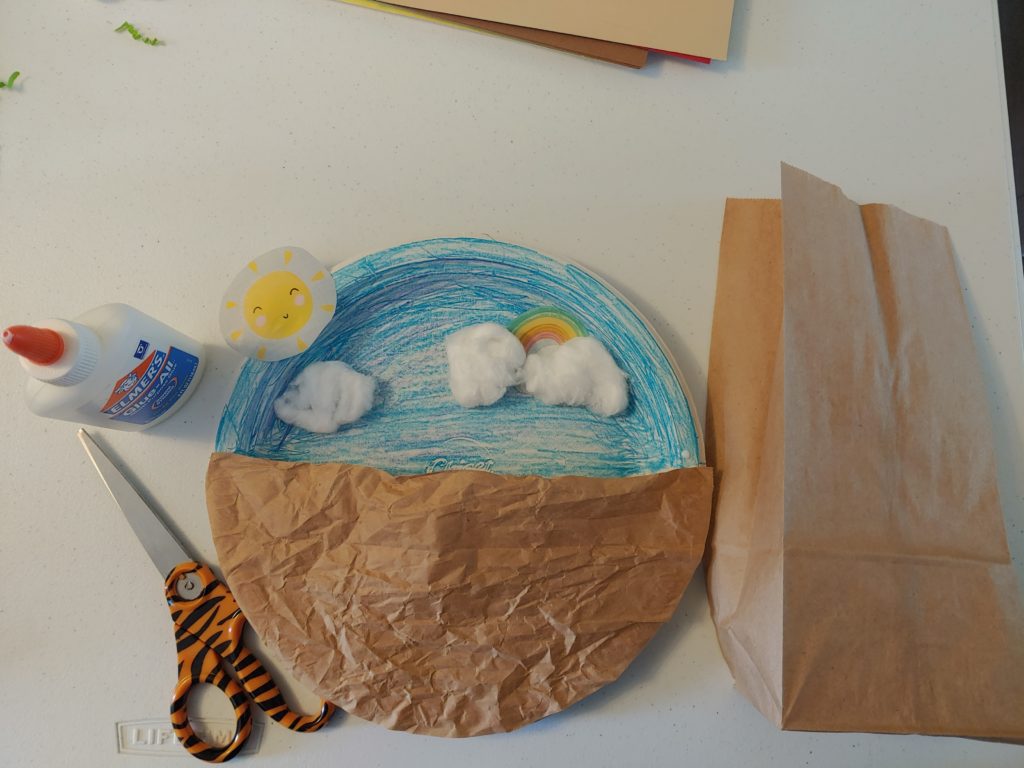
Cut the paper bag in half, crinkle it, and glue it to the edge of the plate.
Let the glue dry and cut off the extra paper.
Use cotton balls and white glue to add clouds. You can also add a sun and rainbow or another decoration.
Fill your nest. The example in the photos use Easter grass. You can use craft paper, markers, and colored cotton swabs with the ends cut off to add color and texture.
Use white glue to attach everything
Add whatever you’d like to your nest! Make some bird eggs, add some flowers, get creative!
Sponsors
Super Science Saturdays are sponsored by PA Cyber and Tender Care Learning Centers, a proud partner of Carnegie Museums of Pittsburgh.
*If you don’t have balloons, follow these same instructions and use an overturned bowl to make a string basket instead. **Cornstarch and flour can be used if white glue isn’t available
Directions
Thin out the glue so that it’s not too thick, but still sticky enough to soak string.
Boil 1 ½ cups water (This is a job for grown-ups.).
Mix in 1 tablespoon of flour and 3 tablespoons of cornstarch
Let cool before using
Put the string in the glue mixture and make sure it’s even coated (make sure to keep your workstation and yourself tidy!).
While the string soaks, blow up balloons into an egg shape.
Choose a bowl to use and flip it upside down
You may want to cover the bowl with plastic wrap for easier clean up
Wrap your string around your balloons, leaving the tied end of the balloon uncovered
Use a few strands to make an edge where the top of your basket will be before wrapping the rest with string (there is no right or wrong way to do this, just have fun!).
Set them on your wax paper and let them dry overnight.
Using a needle, pop the balloon (This is a job for grown-ups.).
Pull the popped balloon gently out of your egg.
Display and enjoy your new string eggs!
Sponsors
Super Science Saturdays are sponsored by PA Cyber and Tender Care Learning Centers, a proud partner of Carnegie Museums of Pittsburgh.