• Skip to primary navigation
  • Skip to main content
  • Skip to primary sidebar

Carnegie Museum of Natural History

One of the Four Carnegie Museums of Pittsburgh

  • Visit
    • Buy Tickets
    • Visitor Information
    • Exhibitions
    • Events
    • Dining at the Museum
    • Celebrate at the Museum
    • Powdermill Nature Reserve
    • Event Venue Rental
    • Gift Cards
  • Learn
    • Field Trips
    • Educator Information
    • Programs at the Museum
    • Bring the Museum to You
    • Guided Programs FAQ
    • Programs Online
    • Climate and Rural Systems Partnership
  • Research
    • Scientific Sections
    • Science Stories
    • Science Videos
    • Senior Science & Research Staff
    • Museum Library
    • Science Seminars
    • Scientific Publications
    • Specimen and Artifact Identification
  • About
    • Mission & Commitments
    • Directors Team
    • Museum History
  • Tickets
  • Give
  • Shop

Blogs from our Scientific Researchers

Carnegie Museum of Natural History is home to active research and vast scientific collections. Our scientific researchers regularly contribute to the blog at the museum.

June 1, 2020 by wpengine

What’s So Good About Being a Slug?

When lifestyles or forms evolve multiple times, we often think they must have some benefit. For example, flying creatures evolved at least 4 separate times: birds, bats, insects, and pterosaurs. These 4 separate origins of flight support the idea that there must be an advantage to flying. (You can probably think of some advantages.)

Slugs evolved from snails more than a dozen separate times. By that logic, there must be an advantage to being a slug, but compared to flight, it’s harder to think what the advantage might be. Slugs evolved from snails by reducing the size of the shell and internalizing it (yes, most slugs have an internal shell), and there are likely to be consequences of reducing the shell.
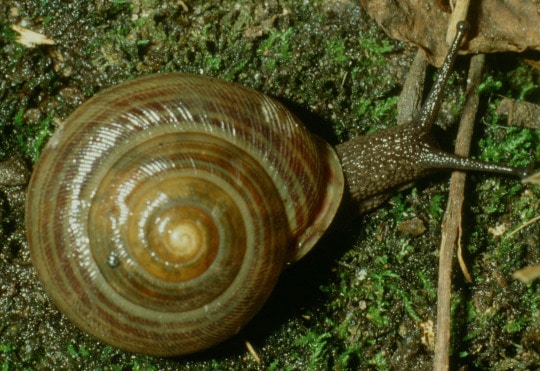
A snail with an external shell large enough for the body to pull back into. Webbhelix multilineata from Ann Arbor, Michigan.

Furthermore, in the lineages leading from snails to slugs, an intermediate stage occurs called a semi-slug (not a slug the size of a semi-truck). In contrast to snails that have an external shell large enough to accommodate the body, or slugs in which the shell is completely internal or absent, semi-slugs have an external shell, but the shell is too small to accommodate the animal’s entire body. Many semi-slugs live on our planet today (for example, Vitrinizonites latissimus lives in the Great Smokey Mountains). Curiously, semi-slugs evolved from snails at least 22 times.
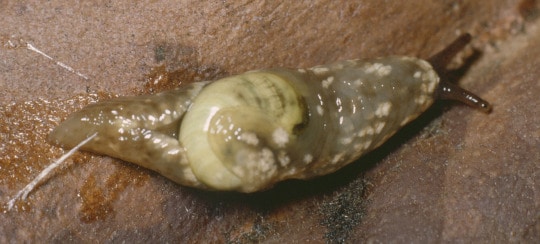
A semi-slug whose external shell is too small for the body to fit into. Family Urocyclidae from Mount Kenya

Let’s consider some possible advantages and disadvantages of these body forms: protection from predators, protection from desiccation (drying out), need for calcium, and fitting into tiny hidey holes. As shown in the table, shells protect snails from predators and from drying out, but the snails still need lots of calcium to build shells, and the rigid shell prevents them from squeezing into tiny hidey holes. Snail score: 2 advantages, 2 disadvantages. Slugs, on the other hand, are not protected from predators or drying out, but have less need for calcium and can fit into tiny hidey holes. Slug score: 2 advantages, 2 disadvantages. However, semi-slugs seem to have all disadvantages: no protection from predators or drying out, a need for calcium, and can’t fit into tiny hidey holes. Semi-slug score: 0 advantages, 4 disadvantages.

Predator protection Desiccation protection Need less calcium Fit in tiny hidey holes
Snail + + – –
Semi-slug – – – –
Slug – – + +

In evolution, every form in a lineage must have at least a limited track record of survival, so how did slugs evolve from snails if they had to go through a life form having so many disadvantages, and how could that evolution have happened so many different times?
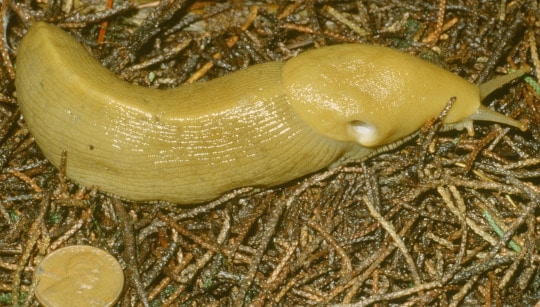
A slug with an internal shell (not visible). Ariolimax cf californicus from the Santa Cruz Mountains, California.

Although we don’t know the answer for sure, my studies suggest some possible answers. I examined locations where slugs and semi-slugs evolved from snails. I discovered that many of those events seem to have happened on oceanic islands (40%) and within 35° of the Equator (80%). Islands often have fewer predators and tropical and subtropical islands often have regular moisture inputs (daily rain or fog), so on islands there might be less need of shells or hidey holes for protection from predators or desiccation. I’m not sure what to predict about calcium because many islands are volcanic, with calcium-poor soils, but calcium carbonate would be available from empty seashells washed up on the shore. If calcium were difficult to find, that might favor forms needing less calcium. Evolutionary biologists use the term “relaxed selection” to refer to a situation in which changes to an organism’s environment cause less need to maintain certain forms or behaviors.

It seems likely to me that relaxed selection on tropical islands allowed the evolutionary transition from snails to semi-slugs to slugs by reducing the disadvantages of having, or not having, a shell.

Where better to be sluggish than on a tropical island?

Timothy A. Pearce, PhD, is the head of the mollusks section at Carnegie Museum of Natural History. Museum employees are encouraged to blog about their unique experiences and knowledge gained from working at the museum.
Filed Under: Blog Tagged With: Museum from Home, Science News, Section of Mollusks, slugs, snails, Tim Pearce

May 29, 2020 by wpengine

Plants with bladders?

Collected on this Day in 1940

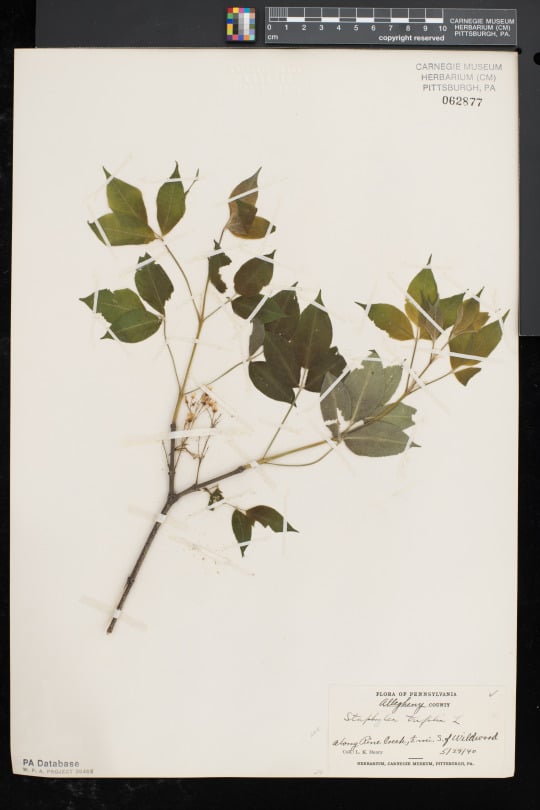
bladdernut specimen on herbarium sheet

This specimen was collected on May 29, 1940 by Leroy Henry along Pine Creek, north of Wildwood outside of Pittsburgh. Leroy Henry was a mycologist (studied fungi) and botanist who was curator at Carnegie Museum from 1937-1973.

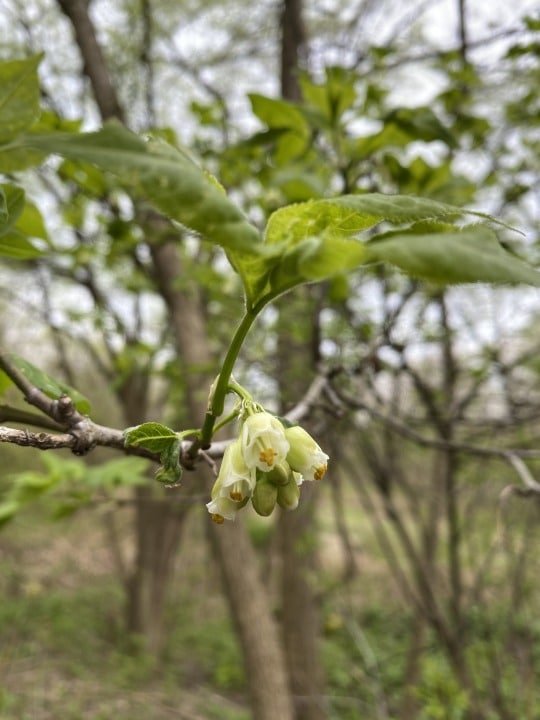
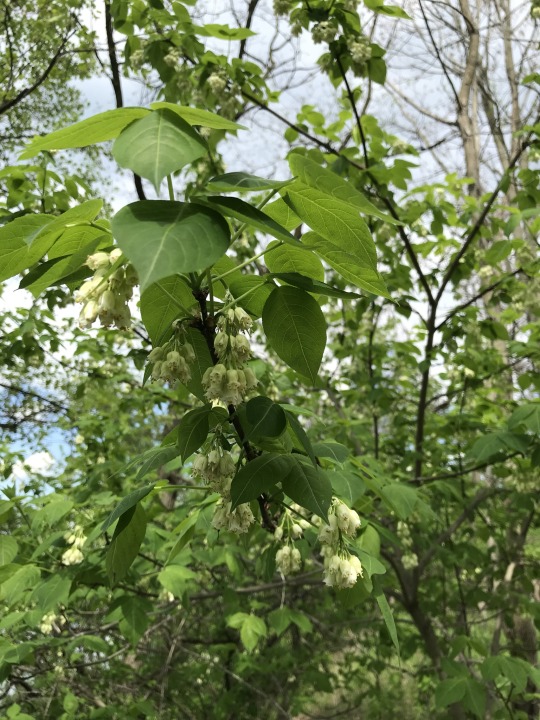
bladdernut flowers
bladdernut flowers

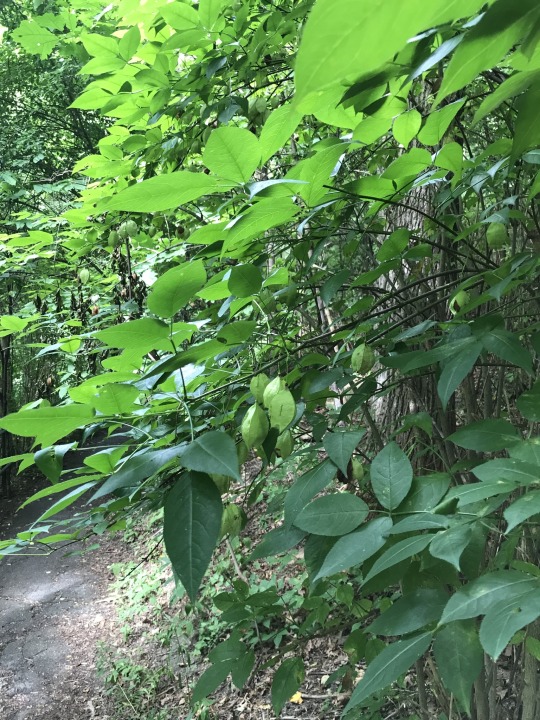
Aptly called “bladdernut” (Staphylea trifolia), this charismatic native understory shrub produces clusters of white flowers in the spring. These dangling flowers develop into striking bladder-like fruit. In each “bladder” pouch are seeds. These fruit often persist through fall and some linger through winter, though the plant is leafless.

bladdernut fruit

Bladdernut has a wide range across eastern North America, and can be found in relatively undisturbed forests in our area, often forming thickets.

Find this specimen here.

Check back for more! Botanists at the Carnegie Museum of Natural History share digital specimens from the herbarium on dates they were collected. They are in the midst of a three- year project to digitize nearly 190,000 plant specimens collected in the region, making images and other data publicly available online. This effort is part of the Mid-Atlantic Megalopolis Project (mamdigitization.org), a network of thirteen herbaria spanning the densely populated urban corridor from Washington, D.C. to New York City to achieve a greater understanding of our urban areas, including the unique industrial and environmental history of the greater Pittsburgh region. This project is made possible by the National Science Foundation under grant no. 1801022.

Mason Heberling is Assistant Curator of Botany at Carnegie Museum of Natural History. Museum employees are encouraged to blog about their unique experiences and knowledge gained from working at the museum.
Filed Under: Blog Tagged With: collected on this day, Hall of Botany, Mason Heberling, Museum from Home, Science News, Section of Botany

May 27, 2020 by wpengine

Mesozoic Monthly: Citipati

The month of May that we’re living in is very different from the one we all anticipated at the start of the year. However, society somehow manages to march on. College students are still graduating, moms are still being celebrated, and Mesozoic Monthly continues! Our honoree for the month of May is known to have been a dedicated parent due to several specimens that show adults guarding eggs. Say hello to Citipati osmolskae!

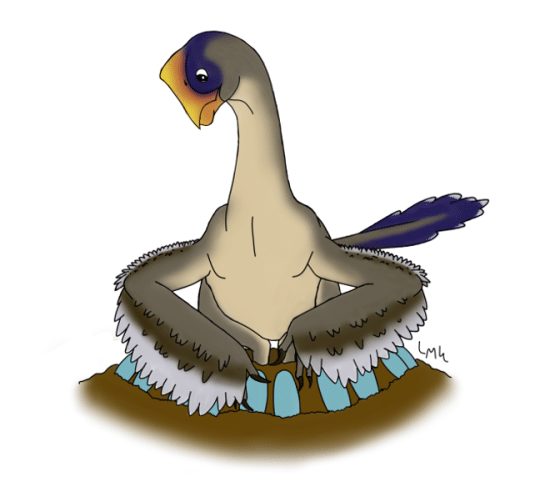
illustration of Citipati, a dinosaur that looks similar to a bird, on a nest of blue eggs

A devoted Citipati parent guarding its nest. Some evidence suggests that the Citipati skeletons found atop nests may have been males (rather than females as was originally thought). Also, recent research indicates that—believe it or not—oviraptorid eggs were blue! Art by ginjaraptor on DeviantArt.

It might not look like it, but Citipati is a theropod, like the more famous dinosaurs Tyrannosaurus, Allosaurus, and Velociraptor. Most theropods were carnivores, sporting skulls with big toothy grins, but not all theropods were ravenous predators! There are several groups of theropods that evolved toothless beaks for specialized diets. One of the stars of Jurassic Park, Gallimimus, was part of a predominantly herbivorous group of beaked theropods called Ornithomimidae. Citipati belongs to another group of beaked theropods called Oviraptoridae. “Oviraptor” means “egg thief,” in reference to an old hypothesis that oviraptorids stole and ate eggs from other dinosaurs’ nests. The discovery of a Citipati skeleton perched in a brooding position atop a nest of eggs was pivotal in changing this idea. We now know that instead of stealing others’ eggs to eat, fossilized oviraptorids preserved near eggs were actually protecting their own eggs! The eggs in an oviraptorid’s nest were arranged in circles with a space in the center for the parent to sit and spread their feathered arms over their incubating young.

photograph of Anzu dinosaur fossil

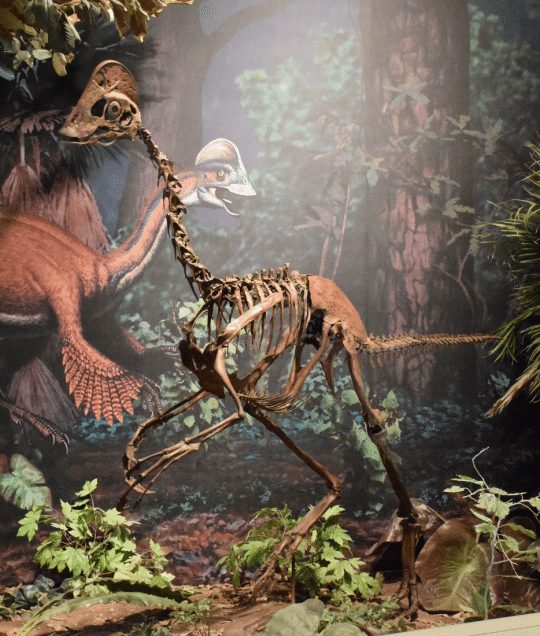
Citipati and other oviraptorids are closely related to one of Carnegie Museum of Natural History’s most bizarre dinosaurs, the ‘Chicken from Hell’ Anzu wyliei, shown here on display in the museum’s Dinosaurs in Their Time exhibition.

So, instead of eggs, what would the toothless beak of Citipati have been used to eat? Because most oviraptorid beaks are very deep, like those of modern parrots, most paleontologists infer that these dinosaurs ate mostly plants. However, this doesn’t necessarily mean that meat was off the menu; it would still have been possible for oviraptorids to have eaten small animals, making them omnivores. On top of its thick skull, Citipati possessed a tall, triangular crest that gave its small head a square-shaped profile. This crest was not as impressive as those on some other dinosaurs, but since Citipati grew to ten feet (three meters) long, the animal would still have been quite imposing. I certainly wouldn’t want to get between a Citipati parent and its eggs!

Citipati fossils are found in the modern Gobi Desert of Mongolia, in rocks known as the Djadokhta Formation. The Djadokhta rocks are made of sediments that were deposited late in the Cretaceous Period, preserving details of the ecosystem that existed there roughly 80–75 million years ago. The name Citipati means “funeral pyre lord,” which is fitting due to the hot environment in which this oviraptorid lived. Also, Citipati shares its name with a Buddhist deity that is believed to protect cemeteries from thieves, which is an appropriate parallel considering how the skeleton of this dinosaur was found guarding its fossilized nest.

Although the habitat Citipati lived in was a desert, like the Gobi Desert that is there today, this prehistoric desert was probably not as dry. In the event of rain, water gathered in temporary streams that drained the water to basins and oases. Since desert rain events are by definition few and far between, any animals that did not live near these oases would have needed to have adaptations for going without water for a long period of time. Some of the animals that lived in this unwelcoming environment alongside Citipati included everyone’s favorite small theropod Velociraptor, the hornless ceratopsian Protoceratops, and the tail-club wielding ankylosaur Pinacosaurus.

Lindsay Kastroll is a volunteer and paleontology student working in the Section of Vertebrate Paleontology at Carnegie Museum of Natural History. Museum staff, volunteers, and interns are encouraged to blog about their unique experiences and knowledge gained from working at the museum.
Filed Under: Blog Tagged With: dinosaurs in their time, Lindsay Kastroll, Mesozoic Monthly, Museum from Home, Science News, Vertebrate Paleontology

May 21, 2020 by wpengine

The Bromacker Fossil Project Part III: Fossil Preparation

New to this series? Read The Bromacker Fossil Project Part I and Part II.

Most of the important fossil discoveries from the Bromacker quarry, located in the Thuringian Forest, central Germany, were shipped to the Carnegie Museum of Natural History (CMNH) for scientific preparation. Between 1993 and 2005 I was the principal preparator of Bromacker fossils.

At CMNH the arrival of a field season’s worth of fossil crates was highly anticipated by Curator Dr. Dave Berman and myself. I’d be often notified of the crate’s early morning delivery by either a grinning security guard or shipping and receiving personnel upon my arrival at the museum. Later that day it would take a team of able-bodied staff from various departments to move the crate from the loading dock to the basement preparation lab, and to lift the plaster and burlap encased block from the crate onto a table.

photo of fossil preparation lab
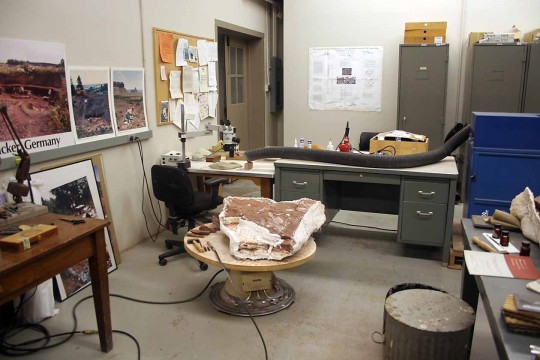
My work area in the basement preparation lab. The table in the center is my main work table and is a made from a dentist chair. The blue cabinet with a hose extending from it is a dust collector, and the microscope (seen at the end of the hose) is mounted on an articulated arm to make it easier to maneuver over a block. Photo by the author, 2007.

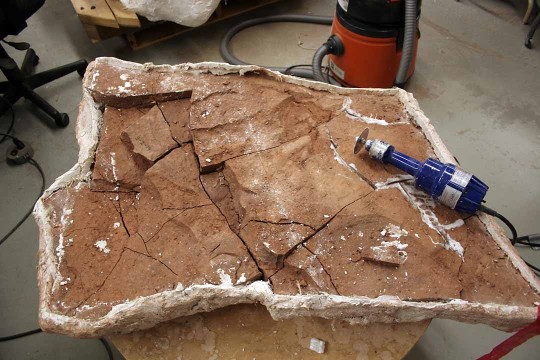
The first step of the preparation process involved opening the block; that is, removing the top of the jacket. I’d use a cast cutter, the same tool doctors use to remove a cast protecting a person’s broken bone, to cut through the top perimeter of the plaster jacket. If all went well, the top would easily lift off the block. But if the top of the jacket stuck to the block or wedged in an undercut, I’d have to cut it into smaller pieces to remove it.

photo of fossil preparation: a block of rock with a cast cutter on top
The block collected in the 2006 field season with its top removed. Exposed bone can be seen left of center. The blue tool resting on the surface of the block is a cast cutter.

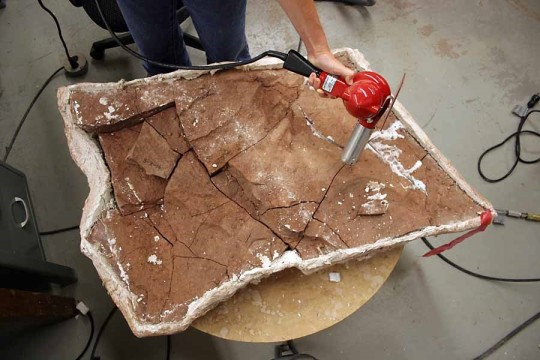
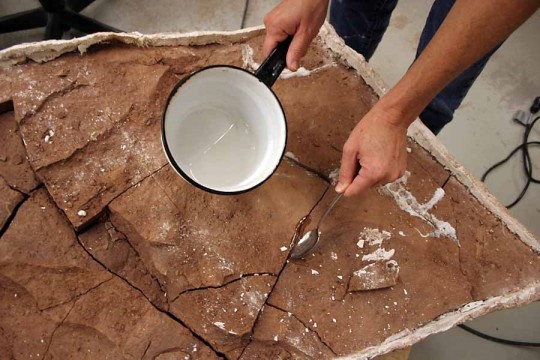
Blocks from the Bromacker quarry typically have numerous cracks coursing through them, which must be stabilized before preparation begins. The product Carbowax works well for filling cracks, because, unlike plaster, it doesn’t shrink when it solidifies. Carbowax comes as a powder, which I’d melt it in a double boiler. Before pouring the hot wax into a crack, I’d heat the surrounding rock with a heat gun so that the wax could penetrate additional cracks not visible from the surface. I’d typically repeat this process numerous times during the preparation process.

image of using a heat gun on a slab of rock in the process of fossil preparation
Using a heat gun to heat the rock before pouring wax into a crack. I’d have to carefully watch the direction I aimed the heat gun so that strands of burlap sticking out of the plaster jacket wouldn’t catch fire. Photo by Norman Wuerthele, 2007.

image
Spooning hot Carbowax into a crack. The spoon was heated beforehand so that the wax wouldn’t solidify on it. It was a delicate balance between getting the spoon hot enough so the wax stayed melted but not so hot that the spoon handle burned my hand. Photo by Norman Wuerthele, 2007.

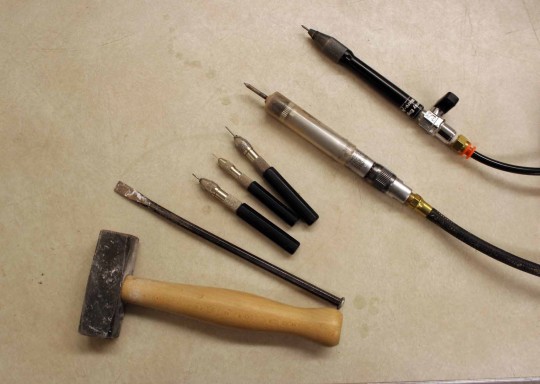
Once the block was stabilized, I began removing rock to expose the fossil. Where thick rock covered the fossil – and it sometimes was more than six inches – I’d use a small hammer and chisel to chip away chunks of rock. As I’d get closer to the fossil, I’d switch to an airscribe, which can be likened to a miniature pneumatic jack hammer. Although fossilized bone from the Bromacker was softer than the surrounding rock, the airscribe would flake the rock from the fossilized bone, leaving behind a thin veneer of rock that I’d remove using a pin vise. I’d also use the pin vise to scrape rock from bone in tight and/or delicate areas, such as teeth. All this work was performed while looking through a microscope.

photo of seven tools used for fossil preparation
Pictured are the tools that I’d use the most when preparing Bromacker fossils. From bottom left to upper right: small hammer and chisel, three pin vises that hold a rod of tungsten carbide of varying thickness and ground to different shaped tips, and two airscribes. Photo by the author, 2007.

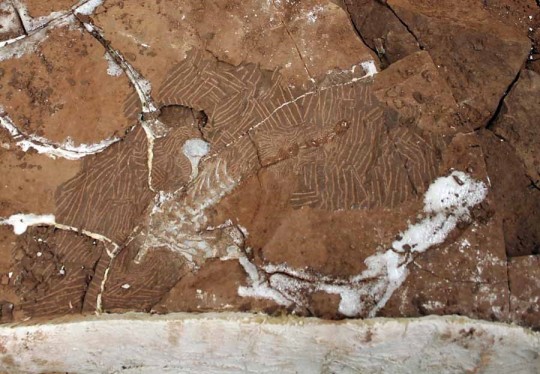
In the block pictured in this post, I could see some tips of some vertebral spines (these are the bumps that you feel down the midline of your back) poking from the rock surface, so I began exposing them first. Because I was working on an articulated specimen (one bone connected to the next bone), I exposed it from front to the rear by simply following one bone to the next bone.

image
The skeleton emerging from the rock—vertebrae, ribs, and the right upper arm bone (humerus) are visible. Notice also the tips of vertebral spines leading away from the exposed portion of the skeleton. The lines in the rock were made by the airscribe. The white substance along cracks is Carbowax. Photo by the author, 2007.

image
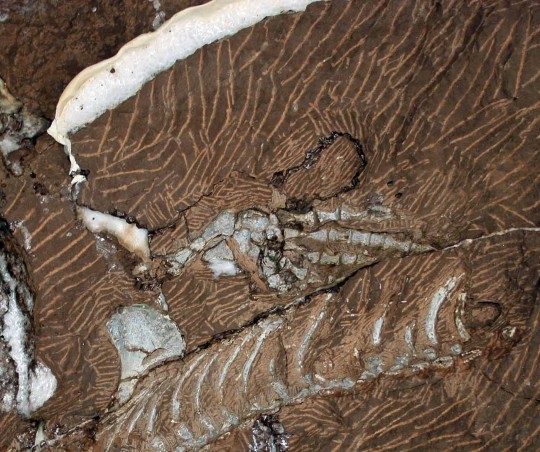
Closeup view of the right foreleg and ribs. Horizontal cracks underneath the fossil made preparation difficult, because they formed gaps underlying the bone. I had to build a dam (upper left) to contain the hot wax so that the wax would penetrate the horizontal crack underlying the bone, instead of running all over the block. Photo by the author, 2007.

image
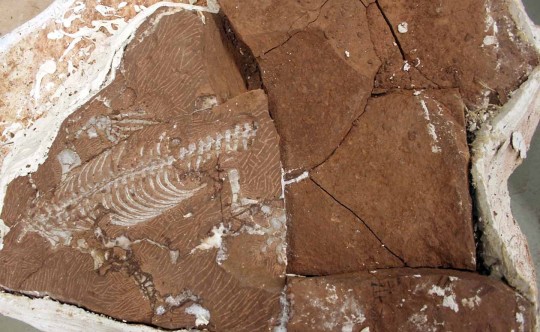
More of the fossil skeleton is exposed, including the torso, the right foreleg, part of the left foreleg, and most of the left hind leg. Photo by the author, 2007.

Parts of the hind legs and tail were collected separate from the block, because rock pieces containing them inadvertently had been tossed on the dump pile. This occurred before the specimen had been discovered, and the bone in these pieces was covered by mud and dirt. Instead of gluing them back in the block before preparation, I prepared them individually at a table under the microscope, as it made for easier viewing. Once all the fossil had been exposed and prepared, I removed excess rock to make the block smaller and lighter weight.

image
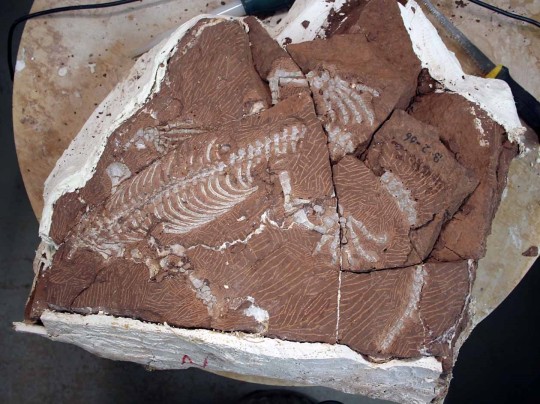
My work on the block has been completed, except for adding some plaster bandages to the end where I had removed excess rock to make the block smaller and lighter. Photo by the author, 2007.

Dave Berman and I later transported the block to a colleague’s lab at the University of Toronto, Mississauga, Canada, where the lab staff and students completed detailed preparation and scientific illustrations of the specimen. This specimen along with several others were recently described as a new genus and species, Martensius bromackerensis, in a paper published in the Annals of Carnegie Museum. This ancient creature will be the topic of a future post. To whet your appetite, here is a link to the news release announcing the publication.

Amy Henrici is Collection Manager in the Section of Vertebrate Paleontology at Carnegie Museum of Natural History. Museum employees are encouraged to blog about their unique experiences and knowledge gained from working at the museum.
Keep Reading

The Bromacker Fossil Project Part IV: Diadectes absitus, A Project-Saving Fossil

Filed Under: Blog Tagged With: Amy Henrici, Museum from Home, Science News, Section of Vertebrate Paleontology

May 18, 2020 by wpengine

Garden for the Birds (or bees, or butterflies, or creepy crawlies, or you get the picture)…

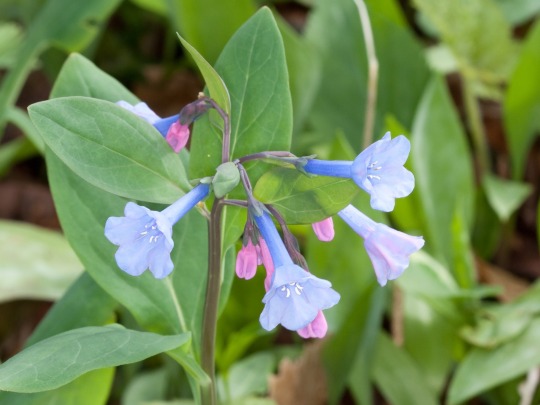
detail photo of blue and pink flowers

“What do I plant?” you may be wondering as spring starts to set in. Maybe you are a master gardener, or maybe you are a novice trying to fill the time during quarantine. Nevertheless, putting plants in the ground is on your mind. What if I told you that choosing native plants over non-native ornamentals does more than create a beautiful landscape – it creates habitat for native wildlife, connects our backyards to bigger natural landscapes, and can help mitigate negative impacts of environmental change.

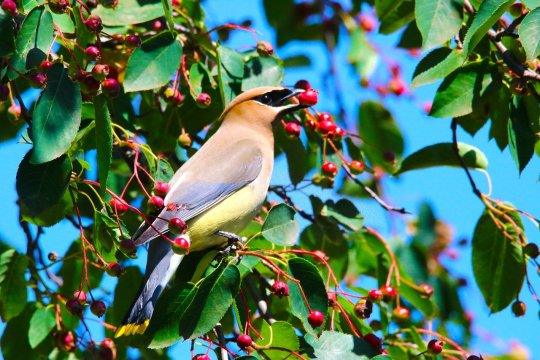
photo of cedar waxwing on a serviceberry branch with a berry in its mouth

Native plants are the plants that occur naturally in the area, and they have evolved with the local environmental conditions and other plants and wildlife that occur in the area. Because of this, native plants often provide the necessary shelter and food needed for local wildlife while requiring little to no fertilizers, pesticides, or water after they are established. Having more native plants in your backyard increases wildlife habitat, reduces air pollution (no mowing required!), decreases erosion (choose plants with deep root systems over non-native grassy lawns), reduces chemicals and excess water use (easy maintenance!), and adds natural beauty to your very own backyard or patio!

Imagine a world where our backyards, patios, and shared spaces are full of native plants – creating a completely connected world full of beautiful plants and providing food and shelter for wildlife. Our landscapes don’t have to be “Developed” OR “Wild”. Our landscapes can be a mosaic of varying levels and sizes of native habitats and local ecosystems – but always with some habitat, connecting one place to the next.

If you want to know more about the benefits of native plants, the sites below are a good place to start.

Benefits of Native Plants for Birds and People

Where I found my inspiration to plant native 

What do I plant? 

Heather Hulton VanTassel, PhD is the Carnegie Museum of Natural History’s Assistant Director of Science and Research. Museum staff, volunteers, and interns are encouraged to blog about their unique experiences and knowledge gained from working at the museum.
Filed Under: Blog Tagged With: Anthropocene, Anthropocene Living Room, Heather Hulton VanTassel, Museum from Home, Science News, We Are Nature 2

May 18, 2020 by wpengine

Air Quality and Urban Gardening

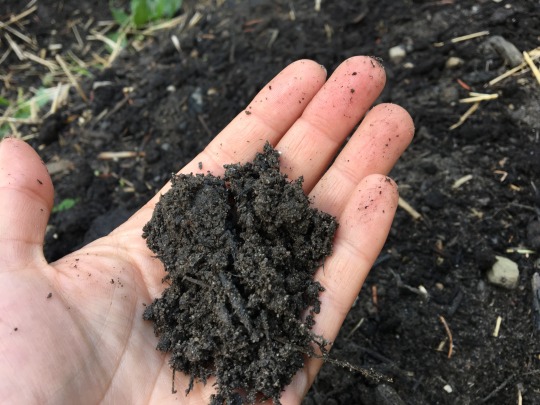
close up photo of hand full of soil

Transforming my ultra-tiny backyard into a garden has been a kind of mental, physical, and spiritual therapy for me during this COVID-19 pandemic. It’s work, even at this scale. But is it healthy? I’m new to Pittsburgh, and unlike my past community gardening experiences at places with better air quality and soil ratings, I now wonder if it’s safe to eat the plants I grow. When I look at the soil, I wonder what more than 150 years of air pollution has done to it. How can I amend past damage, manage the current risks and then eat from it?

I’m not alone in this work. Before I dive in, I want to share a quote by Robin Wall Kimmerer, author of Braiding Sweetgrass: Indigenous Wisdom, Scientific Knowledge and the Teachings of Plants:

“Even a wounded world is feeding us. Even a wounded world holds us, giving us moments of wonder and joy. I choose joy over despair. Not because I have my head in the sand, but because joy is what the earth gives me daily and I must return the gift.”

Professional advice guided my urban garden work. If you are contemplating a similar project, information at the sites listed below will be valuable.

Resources: amending the soil, soil testing, garden planning, and a cool foraging app

Grow Pittsburgh: Info Hub

University of Minnesota: How to Manage Soil and Nutrients in Home Gardens

Phipps Conservatory: Modifying PH Levels in Soil

Falling Fruit – Map the Urban Harvest!

Resources: dangers and benefits of urban gardening and foraging

The Geological Society of America: Hunting Down Hidden Dangers and Health Benefits of Urban Fruit

EurekAlert!: Risk of Lead Poisoning from Urban Gardening is Low, New Study Finds

Oxford Academic: Phytoremediation of Lead: What Works, What Doesn’t

First Step: Soil Test

The work I did to make my soil safe for gardening began with a soil test. A City of Pittsburgh site directed me to a Penn State University Agriculture Extension Office, where for a $9.00 fee, postage to mail a soil sample, and a couple of weeks’ time for testing, I learned that my typical Pittsburgh soil is full of clay and in need of compost and lime.

My front yard faces a busy intersection and contains lead and other contaminants. I decided to try phytostabilization, which is a cheap way to use plants, lime, and compost to both reduce the mobility of heavy metals in the soil and lower the bioavailability of contaminants to the food chain. I wore a mask and gloves when I tilled this soil because contaminants can bind to soil particles and can be inhaled. I mixed some nearby oak leaves into the soil to break up the clay, mixed in some lime, and planted sunflowers. (Any additions of lime should be done according to package directions about how much to use and when to plant.)

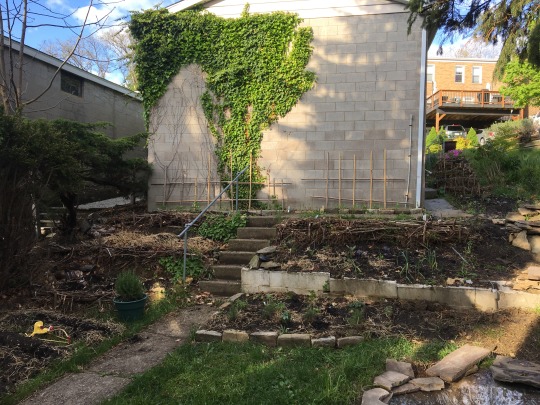
photo of a backyard garden under construction

Soil conditions in my backyard were better, requiring only lime to adjust the pH and lots and lots of compost. The backyard is where I will grow vegetables. I learned during my research that pH and compost are the key elements to healthy soil. If the air quality fluctuates during the gardening season, I will be fine as long as I wash the produce thoroughly before consuming and wash my hands after gardening. Now, after long days of online meetings, I’m able to retreat to my garden and, in good way, work myself tired. I feel better now. I feel happy.

I confess, I’m a renter, and I’m doing this work (with my landlord’s approval of course) even though I don’t own the property. My homeowner neighbors ask me why I care and put in so much energy and money into something I don’t own. I think it’s an easy answer: I live here for now, and I do this work to improve my quality of life, and because “joy is what the earth gives me daily and I must return the gift.”

Asia Ward is CMNH Anthropocene Program Manager and Science Communication Fellow. Museum staff, volunteers, and interns are encouraged to blog about their unique experiences and knowledge gained from working at the museum.
Filed Under: Blog Tagged With: Anthropocene, Anthropocene Living Room, Asia Ward, Museum from Home, Science News, We Are Nature 2

  • « Go to Previous Page
  • Page 1
  • Interim pages omitted …
  • Page 36
  • Page 37
  • Page 38
  • Page 39
  • Page 40
  • Interim pages omitted …
  • Page 43
  • Go to Next Page »

sidebar

About

  • Mission & Commitments
  • Directors Team
  • Museum History

Get Involved

  • Volunteer
  • Membership
  • Carnegie Discoverers
  • Donate
  • Employment
  • Events

Bring a Group

  • Groups of 10 or More
  • Birthday Parties at the Museum
  • Field Trips

Powdermill

  • Powdermill Nature Reserve
  • Powdermill Field Trips
  • Powdermill Staff
  • Research at Powdermill

More Information

  • Image Permission Requests
  • Science Stories
  • Accessibility
  • Shopping Cart
  • Contact
  • Visitor Policies
Stay in the loop! Sign up for our newsletter(s).
One of the Four Carnegie Museums | © Carnegie Institute | Privacy Policy | Terms of Use | Accessibility
Rad works here logo